Recently we have published a story which describes the way following which you can Unbrick your Xiaomi Mi A1. Fortunately, we are back and in this story, we will be telling you the procedure to Root Xiaomi Mi A1 running Android Oreo. In this, you will learn about installing TWRP recovery on your device as well. So without wasting a single second let’s jump to the main course.

Mi A1 is undoubtedly a very popular device and the reason behind this is its Dual-Camera setup and stock Android. The device has recently received the Android 8.0 Oreo update after which a lot of users were demanding an article telling how to root it now.
We will suggest taking a complete backup of your device as no one knows when the rooting process will get converted into a nightmare. Make a copy of files stored in your internal storage or you can backup using services like Google Drive, etc. Do note that rooting voids the warranty of your smartphone as in some cases users have damaged their devices by overclocking their CPU’s.
Note: This process might appearing boring to you as it is quite lengthy, consider reading the entire article for best results.
Steps to Root Xiaomi Mi A1 running Android Oreo
Pre-requisites
1.) Here we need a Mi A1 handset and specifically the one which has unlocked the bootloader.
2.) Your handset’s battery should have 60-70% charge remaining at least.
3.) A Laptop/PC running Windows operating system.
4.) A working data transfer USB cable.
Downloads:
Magisk zip file, Download Magisk Manager
oreo_3.2.2_recovery.img – Download
patched_boot.img – Download
modified TWRP by DroiDMester – Download
Steps to Install TWRP recovery on Mi A1 handset running Android Oreo?
- Firstly download ADB and Fastboot drivers on PC/Laptop.
- You need to turn off the Windows driver signature enforcement mechanism. Follow the given link to know more about it.
- Download the three mentioned files and copy them to C drive on your PC: (patched_boot.img, Oreo_3.2.2_recovery.img and twrp-3.2.1-1-installed-tissot-FIXED_by_DroiDMester.zip).
- Turn on USB debugging, OEM unlocking.
- Connect your Mi A1 to PC/Laptop through a USB cable.
- Now go to C drive where files have been pasted, copy the three files and paste them to a smartphone as well.
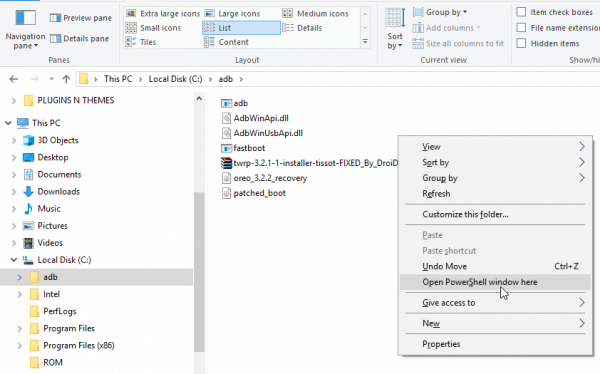
- Go to ADB and Fastboot folder. Here hold shift and right-click anywhere in blank place(Open command window here/Open PowerShell here) to start the command prompt.

- Give the below-mentioned command to your PC so that your handset can boot into bootloader mode:
adb reboot bootloader
- Now boot your handset in recovery mode by giving below mentioned command:
fastboot boot oreo_3.2.2_recovery.img
- Your handset will now boot into TWRP recovery, however, it will not install the recovery yet. It will ask you to swipe for allowing modifications.
- In TWRP recovery click on the install button and locate the “twrp-3.2.1-1_…..DroiDMester.zip”.
- Now swipe to install the TWRP recovery.
- After flashing go to TWRP menu by pressing the Home button, here choose the “Reboot” option.
- Reboot menu will further display a number of options, here select the slot A or B keeping in mind on which partition slot your device is running. (It will show the current slot on the screen)
- Go to TWRP menu again and select Reboot, here select bootloader and press the “do not install” option. Now your device will go into bootloader mode again.
- Now go to PC and give the below-mentioned command:
fastboot boot oreo_3.2.2_recovery.img
- This command will reboot your device to recovery mode and here again click on the “Install” button.
- Locate the “twrp-3.2.1-1_…..DroiDMester.zip” file again and swipe to install the recovery.
- This will install the recovery finally.
Read More about Xiaomi Mi A1:
How to resolve Xiaomi Mi A1 Dialer App bug running Android Oreo
Best custom ROMs for Xiaomi Mi A1
[ROOT] How to change Xiaomi Mi A1 font
Steps to Root Xiaomi Mi A1 with Magisk?
- Download Magisk zip file and install the Magisk manager on your smartphone.
- Store this Magisk.zip file somewhere in your handset.
- Now turn off your handset and reboot to recovery mode by holding Power button+Vol up simultaneously.
- After entering the TWRP recovery click on the Install button and locate the Magisk zip file. This is the final step to Root Xiaomi Mi A1.
- Swipe to confirm flashing. After its completion reboot to system and you are done. Now you have rooted your Xiaomi Mi A1.
We hope you have successfully implemented our guide to root Xiaomi Mi A1. In case you find some error or bug you can ask in the comments below.
