At Google I/O 2018, a ton of new announcements were made out of which one was the Google Lens integration in Google Assistant. This new feature has been received by some of the devices right now including Pixel and OnePlus. A few moments back Google has also released some high-end features for the Google Lens. Using AI and machine learning Google Lens can now perform Smart text selection, real-time search, etc. However, as mentioned above these new features are limited to a few devices. Google has already released their Photos app with Google Lens integration but still a lot of users are a searching a way to get it. Here we are going to show you how to install Google Lens on Android smartphone without rooting.

Google lens is now an embedded feature rather than a standalone app (App is also now available) , so we can say it is a great feature. In case you are new to Google lens then it enables a user to recognize various objects, text, present in the images. Suppose you have just clicked an image of your pet dog then by just using Google lens you can clearly get to know about the specific breed, images, etc. It makes use of artificial intelligence to find the results through internet. The feature doesn’t work without an active network connection. A lot of users are in search of it as they still aren’t getting this exceptional feature in their Google Photos app.
In our today’s write-up, we will be describing you the way to install Google lens on Android phone without rooting. Just follow the below-provided steps and you will probably end up with flying colors.

Steps to install Google Lens on Android Phone without Rooting
1.) If your Android device already had Google Photos app installed then make sure that it is updated to the latest version. If not, simply rush to the Play Store.
2.) We will suggest you installing version v3.15.0.187517307 or above of the app.
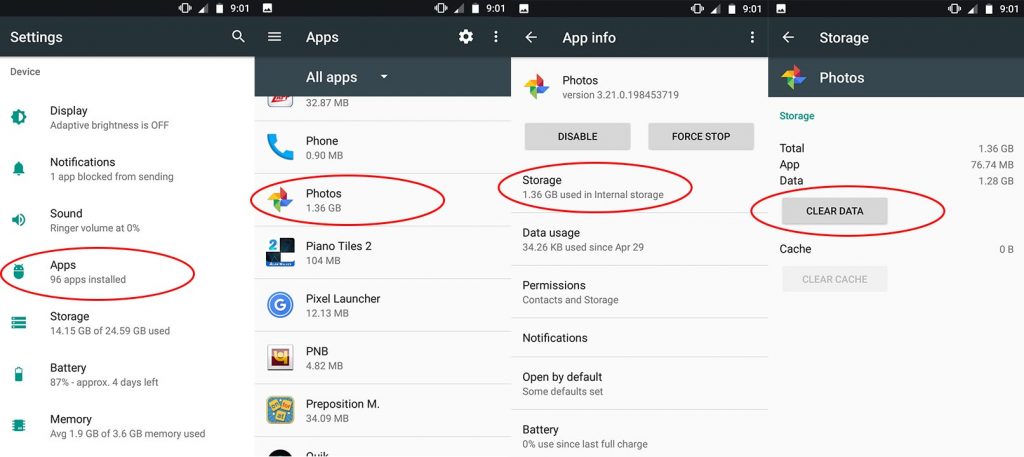
3.) Now head over to the settings menu of your Android device.
4.) Make sure that you have backed up the entire data as the next feature might end up deleting your data.
5.) Tap apps section here and search for Photos app, now click on the storage section and here click on clear data option.
6.) Now reboot your Android smartphone and you will notice that in Google Photos app, Google lens feature have been enabled.
8.) To use this just locate an image and click on the “lens” icon to start the AI processing.
Now you can directly download Google Lens from Play Store. It does not need any tinkering as like above.
Download Google Lens
Google Lens Download from Play Store
This is the easiest method to enable or install Google lens on Android smartphone without rooting access. For more Android stuff stay tuned to GoAndroid.
