Obviously, OnePlus 3/3T users are now on cloud nine. Since OnePlus had put forth initial steps necessary for Android Oreo update to the yesteryear flagships by pushing OxygenOS Open Beta 25/16 with Oreo as the base. And we’re sure to a certain extend that some users who have installed the Oreo Open Beta could be now in search of methods to root the OxygenOS. For them, this guide should be useful.

Unbelievably, one among the genius senior members over at XDA has now developed an exploit that can root the Open Beta 25/16, which was released just 1 or 2 days ago. Electrifyingly fast isn’t it? Anyway, we will be now sharing you the rooting method over here. Read on!
General Method adopted to Root OxygenOS Open Beta 25/16
Basically, root access is achieved by flashing custom recovery, here TWRP recovery and then installing latest SuperSu v8.2 SR5.zip(5th Stable Release). Ultimately, flashing DM-Verity and Force-Encryption disabler via TWRP in order to address the problem caused by tampering of the core OS.
Pre-requisites
OnePlus 3/3T on which latest Oxygen OS Beta 25/16 is installed. Minimal ADB and Fastboot, Unlocked Bootloader, TWRP recovery designated for OnePlus 3/3T, SuperSu v8.25 SR5 and “DM-Verity and Force-Encryption disabler”. Most importantly, patience.
(Download links for all required files are provided at the end of this post)
So, let us begin the rooting step-by-step.
Warning : Proceed further if and only if you know the risk associated with flashing custom recovery or rooting. We’re not responsible for any damage or data loss that happens to your device on following this procedure. Do this at your own risk.
1. Install TWRP recovery on OnePlus 3/3T running OxygenOS Beta 25/16
Get ready with your PC or laptop, in which Minimal ADB and Fastboot is installed. Then follow the below steps.
- Make sure, SuperSU flashable Zip file is safely stored to your phone memory in any suitable directory.
- Copy the TWRP file to the folder where ADB and Fastboot are installed.
- Turn off your OnePlus 3/3T.
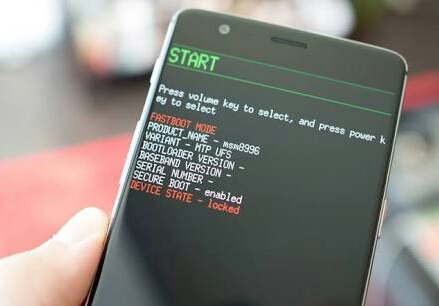
- Boot your OnePlus 3/3T into Fastboot mode > Press and hold the Volume Up Button + Power Button.

- Connect your phone to your PC via USB Cable.
- Open a command window on the folder where ADB and Fastboot are installed.
- Go to the folder where ADB and Fastboot are installed.
- Hold down Shift Key > Right Click on the empty space > Choose ‘Open CMD Here’.
- Execute the below command in the command window to see if your device is properly connected:
fastboot devices
- Make sure the TWRP file is in the ADB folder. Execute the below command to install TWRP on your OnePlus 3/3T running Android Oreo:
fastboot flash recovery TWRP-Oreo-OnePlus-3-3T.img
- Fastboot will be replacing Stock recovery with TWRP.
- Don’t restart your device once installation completes. Because rooting is yet to be done. Jump to the next step.
2. Root OnePlus 3/3T running Android Oreo
Immediately after completing the above first steps. Do the following.
Note: The latest SuperSu v8.2 SR5 is inevitable. Neither magisk nor previous SR4 release of the SuperSu can do the job.
- In Fastboot Mode, use the volume buttons and choose ‘Recovery Mode’ and then press the power button to enter TWRP Recovery.
- Once you are in TWRP > Tap on ‘Install’ > Choose the SuperSU Zip file which you have downloaded from above > Swipe right to flash.
- Of course, you’ve now rooted your device.
- But again, don’t reboot the device.
- Since you’ve to disble the DM-Verity checksum and Force-Encryption to avoid boot loops.
- Proceed to third step with immense patience.
3. Disable DM-Verity and Force Encryption.
For the time being, just note that DM-Verity and Force-Encryption are the security precautions implemented by OnePlus as well as other OEM’s to prevent tamperament or modification of System.
DM-Verity disabling is different depending on the current state of your device. i.e. whether encrypted or non-encrypted.
Currently Encrypted Devices
Procedure 1: This is applicable only to users who have their data currently ENCRYPTED and needs the zip just for NOT TRIGGERING DM-VERITY.
- Assuming you’re now in TWRP recovery mode, after the second steps.
- Mount the system in TWRP.
- Make sure you can browse and see the contents of the system folder via TWRP file manager – This is very important.
- Flash “DM-Verity and Force Encryption Disabler For OOS Oreo.zip” in TWRP.
- Done.
- Finally, Reboot to System.
Non-Encrypted Devices
Procedure: This is applicable only to users who have their data currently NOT ENCRYPTED AND KEEP IT DECRYPTED
- Mount the system in TWRP. Make sure you can browse and see the contents of the system folder via TWRP file manager – This is very important.
- Flash “DM-Verity and Force Encryption Disabler For OOS Oreo.zip” in TWRP.
- Reboot back to TWRP
- Done.
- Reboot to System.
NB: The above Procedure should prevent force encryption in almost all cases but users have reported that the above steps failed to decrypt the device in some instances.
Conclusion
Above in this article, we’ve tried our best to enlist each and every steps needed for successfully rooting OxygenOS OpenBeta 25/16. The procedures are tested and is 100% working, if done properly. However, errors or failures are not completely ignored.
Although root access has got its own merits and demerits, we’d recommend our readers to stick with the untampered firmware. Since, safety and satisfaction of our readers are our utmost priority.
Have any questions can ask us in the comments below.
Downloads
TWRP for OnePus 3/3T; Google Drive.
Minimal ADB and FastBoot: Google Drive.
SuperSu v8.2 SR5.zip: Google Drive.
DM-Verity and Force Encryption Disabler For OOS Oreo.zip: XDA
Credits: Akhil Narang & Xennet (Senior Members at XDA)
